3.8K
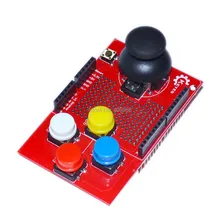
In this code example we will take a look at the PS2 JOYSTICK SHIELD V2.0.

The X-axis of the joystick is connected to pin A0 of Arduino, the Y-axis to pin A1, power supply to 5V and ground to GND.
There are four buttons on the PS2 JOYSTICK SHIELD . D3 should be connected to digital pin 3; D4 to digital pin4; D5 to digital pin 5; D6 to digital pin 6. The other small button is reset button.
Generally, PS2 rocker can be used for controlling small vehicles. It is mainly comprised of two 10K potentiometers and a button switch. The five ports are VCC, X, Button, Y and GND.
Code
[codesyntax lang=”cpp”]
char button0=3;
char button1=4;
char button2=5;
char button3=6;
char joybutton=2;

void setup(void)
{
  //set all as inputs
  pinMode(joybutton, INPUT);
  pinMode(button0, INPUT);
  pinMode(button1, INPUT);
  pinMode(button2, INPUT);
  pinMode(button3, INPUT);

  //set all high
  digitalWrite(joybutton, HIGH);
  digitalWrite(button0, HIGH);
  digitalWrite(button1, HIGH);
  digitalWrite(button2, HIGH);
  digitalWrite(button3, HIGH);

  Serial.begin(9600);
}

void loop(void)
{
  Serial.print(analogRead(0));
  Serial.print(",");
  Serial.print(analogRead(1));
  Serial.print(",");

  //Read the value of the buttons and print it on the serial port.
  Serial.print(digitalRead(button0));
  Serial.print(digitalRead(joybutton));
  Serial.print(digitalRead(button0));
  Serial.print(digitalRead(button1));
  Serial.print(digitalRead(button2));
  Serial.println(digitalRead(button3));

  delay(1000);
}
[/codesyntax]
Links
 PS2 JOYSTICK SHIELD V2.0 for Arduino
