In this article we look at a Triple-axis Magnetometer, the KX132 Triple Axis Accelerometer and connect it to an Arduino Uno, I actually used an R4 Minima with a sensor shield to prove that it would work.
Sensor Information
The KX132 is a digital accelerometer from Kionix.
The KX132 is a low-power, 16-bit resolution three-axis accelerometer with four user-selectable acceleration measurement ranges of ±2g/4g/8g/16g and has up to a 10kHz (max) output data rate making it ideal for a wide range of acceleration measurements as well as high-speed applications such as vibration and tap sensing.
The KX132 includes a host of features including Freefall detection, Directional Tap™ and Double-Tap™ detection, tilt orientation detection and more.
The Qwiic KX132 can interface with controllers using both I2C and SPI at high speeds so you can use it in an existing Qwiic/I2C chain or on a SPI bus.

Features
Measurement Range: ±2g, ±4g, ±8g, ±16g (User Selectable)
High Resolution (8 or 16-bit)
User-Configurable Output Data Rate (ODR) up to 25600Hz
User-Configurable 3-stage Advanced Data Path featuring low-pass filter, low-pass/high-pass filter, and RMS calculation engine
Wide range of built-in sensing functions
- Free Fall
- Directional-Tap™ / Double-Tap™
- Device Orientation & Activity Algorithms
Low Noise: 130µg/√Hz (varies based on ODR, power mode & other settings)
High-Resolution Wake-Up & Back-to-Sleep Detection with a configurable threshold as low as 3.9mg
512-byte FIFO buffer that continues recording data while being read
Selectable Low-Power or High-Performance operating modes
Low Power with Integrated Voltage Regulator
- High Performance Operating Current Consumption (400Hz ODR + Wake-Up Detection): 148µA
- Low Power Operating Current Consumption (0.781Hz ODR + Wake-Up Detection): 0.53µA
- Standby Current Consumption: 0.5µA
Self-Test Functionality
Digital I2C up to 3.4MHz and Digital SPI up to 10MHz
2x Qwiic Connectors
SPI available on PTH Header Pins
I2C Address: 0x1E (0x1F can be used as an alternate)
Parts Required
You can connect to the sensor using DuPont style jumper wire.
| Name | Link |
| Arduino Uno | UNO R3 CH340G with usb cable |
| KX132 | Aliexpress link |
| Connecting cables | Male to Male + Male to Female and Female to Female Jumper Wire Dupont Cable |
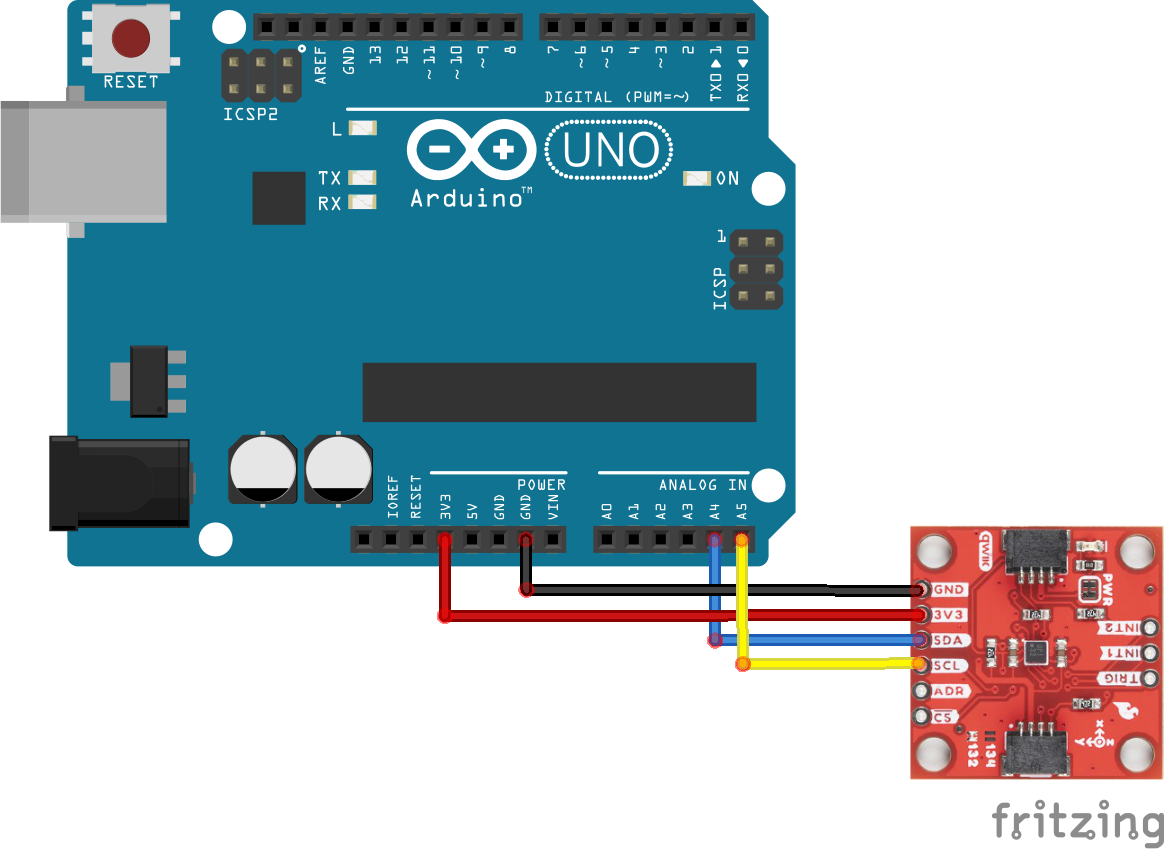
Schematic/Connection
I used 3.3v from the Arduino Uno
I also used a Qwiic cable but if you do not have one of them there is an unpopulated set of pins you can solder a header to. This is how you would wire this up
Code Example
I installed the Sparkfun library using the Arduino ide
Click the Manage Libraries … menu item, search for KX132, and select the Sparkfun KX13x library like this
This is one of the examples that gets installed with the library, with a few comments and unused lines removed.
#include <Wire.h>
#include <SparkFun_KX13X.h>

SparkFun_KX132 kxAccel;

outputData myData; // Struct for the accelerometer's data

void setup()
{

  Wire.begin();
  Serial.begin(115200);

  // Wait for the Serial monitor to be opened.
  while (!Serial)
    delay(50);

  if (!kxAccel.begin())
  {
    Serial.println("Could not communicate with the the KX13X");
    while (1)
      ;
  }
  Serial.println("Ready.");

  if (kxAccel.softwareReset())
    Serial.println("Reset.");

  // Give some time for the accelerometer to reset.
  delay(5);

  // Many settings for KX13X can only be
  // applied when the accelerometer is powered down.
  kxAccel.enableAccel(false);

  kxAccel.setRange(SFE_KX132_RANGE16G); // 16g Range
  kxAccel.enableDataEngine(); // Enables the bit that indicates data is ready.
  kxAccel.enableAccel();
}

void loop()
{
  // Check if data is ready.
  if (kxAccel.dataReady())
  {
    kxAccel.getAccelData(&myData);
    Serial.print("X: ");
    Serial.print(myData.xData, 4);
    Serial.print(" Y: ");
    Serial.print(myData.yData, 4);
    Serial.print(" Z: ");
    Serial.print(myData.zData, 4);
    Serial.println();
  }
  delay(500);
}
Output
When run and the sensor was moved around
Ready.
Reset.
X: 0.3738 Y: -0.2259 Z: -0.8711
X: -0.4060 Y: -0.8135 Z: 0.1420
X: 0.5954 Y: 0.5861 Z: -0.6344
X: 0.2396 Y: 0.4943 Z: -0.9438
X: -0.7593 Y: -0.2772 Z: 0.6500
X: 0.1269 Y: 0.6046 Z: 0.9662
X: -0.0737 Y: -0.8306 Z: -0.3201
X: 0.3875 Y: -0.1732 Z: -1.0043
X: -0.5993 Y: -0.5290 Z: 0.6237
