In this article we connect an MSA301 accelerometer to an Arduino Uno – other arduino boards should be Ok as well
Sensor Information
Lets look at some information regarding the sensor, this is from the datasheet
MSA301 is a triaxial, low-g accelerometer with I2C digital output for consumer applications.
It has dynamical user selectable full scales range of ±2g/±4g/±8g/±16g and allows acceleration measurements with output data rates from 1Hz to 500Hz
FEATURES
User selectable range, ±2g, ±4g, ±8g, ±16g
1.62V to 3.6V supply voltage,
1.2V to 3.6V IO supply voltage
User selectable data output rate
I2C Interface
One interrupt pin
14 bits resolution
This is the sensor that I bought
Parts Required
The sensor you can pick up in the $6 price range – you can connect to the sensor using a standard header the classic dupont style jumper wire.
I used a Qwiic cable with dupont connector on the end – since a few sensors seem to use these but this is optional you can easily solder a header and connect
Schematic/Connection
I used the Adafruit MSA301 sensor and in this case used the Stemma connection
For the STEMMA QT cables, it uses the Qwiic convention:
Black for GND
Red for V+
Blue for SDA
Yellow for SCL
So color coded for ease of use, this layout shows a connection to the module
I also used 3.3v from the board, although you can quite easily use 5v, if you are using the header then connect to the pin marked Vin – the 3Vo pin is the 3.3V output from the voltage regulator on the sensor.
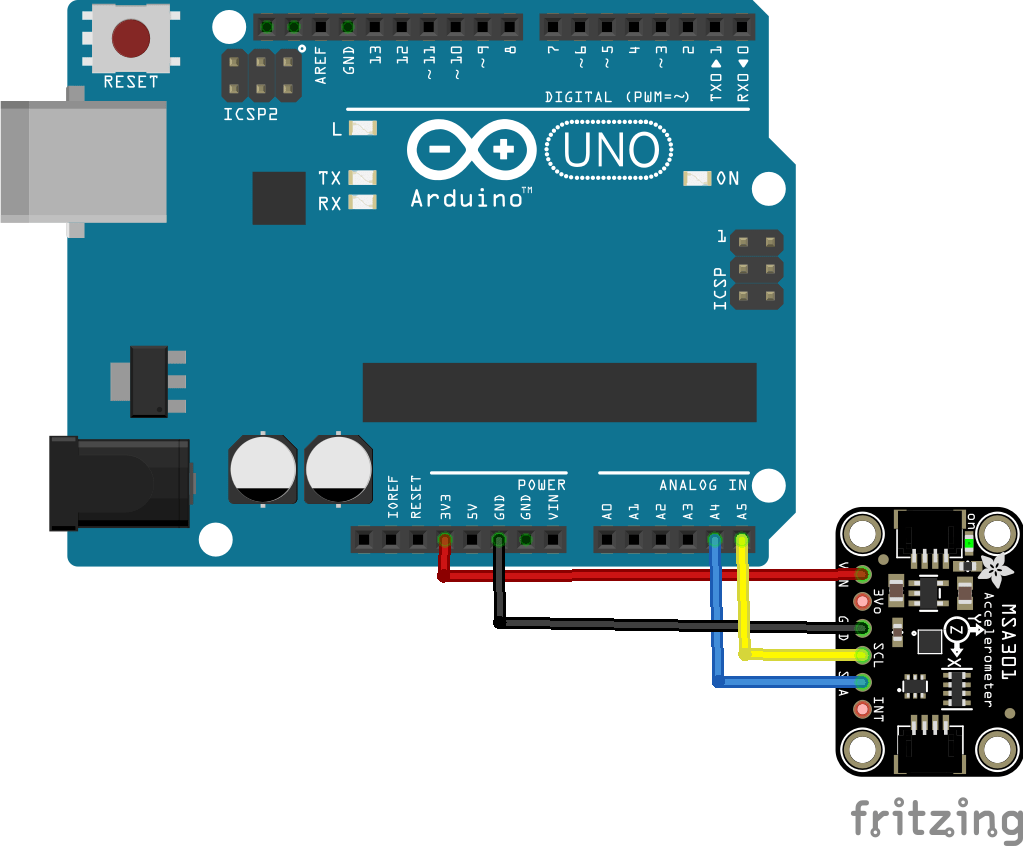
Arduino Uno and MSA301 layout
Code Examples
This uses a library from Adafruit installed using the Library Manager in the Arduino IDE. search for Adafruit MSA301, and select the Adafruit_MSA301 library. You will also need to add another couple of libraries Adafruit BusIO library and t he Adafruit Unified Sensor library
We will look at 2 of the 4 examples – a tap example and an accelerometer example
Tap example
[codesyntax lang=”cpp”]
// Basic demo for tap/doubletap readings from Adafruit MSA301

#include <Adafruit_MSA301.h>

Adafruit_MSA301 msa;

void setup() {
  Serial.begin(115200);
  while (!Serial) { delay(10); }

  // Try to initialize!
  if (! msa.begin()) {
    Serial.println("Failed to find MSA301 chip");
    while (1) { delay(10); }
  }
  Serial.println("Found MSA301!");

  msa.setPowerMode(MSA301_NORMALMODE);
  msa.setDataRate(MSA301_DATARATE_1000_HZ);
  msa.setBandwidth(MSA301_BANDWIDTH_500_HZ);
  msa.setRange(MSA301_RANGE_2_G);
  msa.setResolution(MSA301_RESOLUTION_14 );

  msa.setClick(false, false, MSA301_TAPDUR_250_MS, 25);
  msa.enableInterrupts(true, true);  // enable single/double tap
}

void loop() {

  uint8_t motionstat = msa.getMotionInterruptStatus();
  if (motionstat) {
    Serial.print("Tap detected (0x"); Serial.print(motionstat, HEX); Serial.println(")");
    if (motionstat & (1<<5)) {
      Serial.println("\t***Single tap");
    }
    if (motionstat & (1<<4)) {
      Serial.println("\t***Double tap");
    }
    Serial.println("");
  }
  delay(10);

}
[/codesyntax]
Output
Here is an example of what I saw in the serial monitor window – you may see some different results
Found MSA301!
Tap detected (0xFF)
***Single tap
***Double tap
Tap detected (0x20)
***Single tap
Tap detected (0x20)
***Single tap
Tap detected (0x20)
***Single tap
Acceleration example
I cut down some of the config settings that are in the example as I was not setting any of them
[codesyntax lang=”cpp”]
// Basic demo for accelerometer readings from Adafruit MSA301

#include <Wire.h>
#include <Adafruit_MSA301.h>
#include <Adafruit_Sensor.h>

Adafruit_MSA301 msa;

void setup(void) {
  Serial.begin(115200);
  while (!Serial) delay(10);     // will pause Zero, Leonardo, etc until serial console opens

  Serial.println("Adafruit MSA301 test!");

  // Try to initialize!
  if (! msa.begin()) {
    Serial.println("Failed to find MSA301 chip");
    while (1) { delay(10); }
  }
  Serial.println("MSA301 Found!");

}

void loop() {
  msa.read();      // get X Y and Z data at once
  // Then print out the raw data
  Serial.print("X:  ");
  Serial.print(msa.x);
  Serial.print("  \tY:  ");
  Serial.print(msa.y);
  Serial.print("  \tZ:  ");
  Serial.print(msa.z);
  delay(100);

  /* Or....get a new sensor event, normalized */
  sensors_event_t event;
  msa.getEvent(&event);

  /* Display the results (acceleration is measured in m/s^2) */
  Serial.print("\t\tX: ");
  Serial.print(event.acceleration.x);
  Serial.print(" \tY: ");
  Serial.print(event.acceleration.y);
  Serial.print(" \tZ: ");
  Serial.print(event.acceleration.z);
  Serial.println(" m/s^2 ");

  Serial.println();

  delay(100);
}
[/codesyntax]
Output
And in the serial monitor you should see something like this
X: 841 Y: -738 Z: 1182 X: 3.98 Y: -3.51 Z: 6.00 m/s^2
X: 950 Y: -633 Z: 1609 X: 3.92 Y: -3.66 Z: 5.81 m/s^2
X: 513 Y: -871 Z: 1002 X: 1.03 Y: -4.48 Z: 7.22 m/s^2
Links
