In this example we will connect an RGB LED to our Arduino and control it via a C# winforms app that will send commands down to the Arduino via the com port. In this example we keep the commands very simple and we hardcode the com port in our C# App (not good practice)
Here is the circuit you need to build
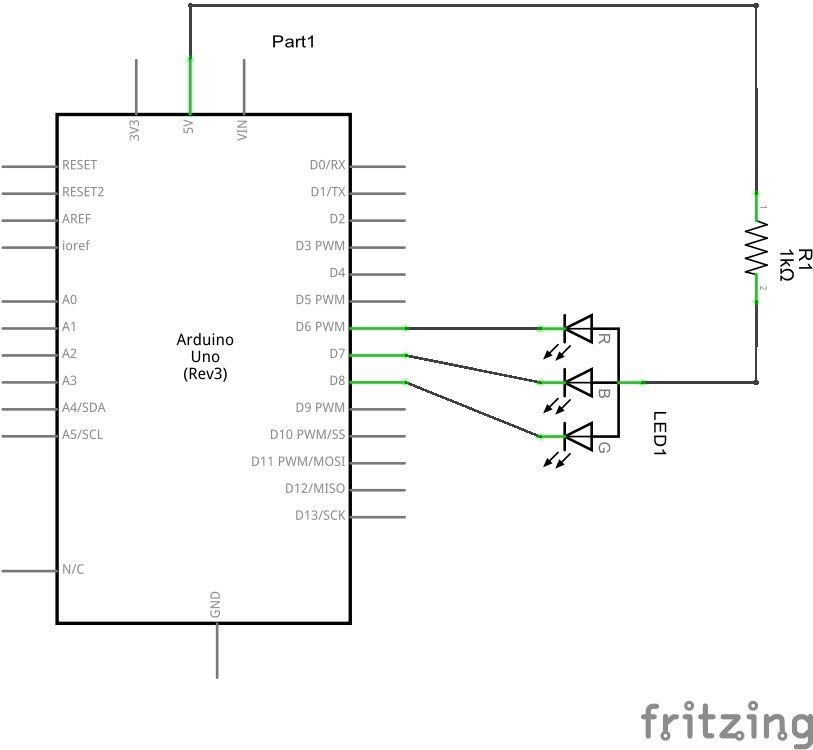
Arduino RGB schematic
Arduino Code
[codesyntax lang=”cpp”]
void setup()
{
  // declare the serial comm at 9600 baud rate
  Serial.begin(9600);

  // output pins
  pinMode(6, OUTPUT); // red
  pinMode(7, OUTPUT); // green
  pinMode(8, OUTPUT); // blue
  digitalWrite(6, HIGH);
  digitalWrite(7, HIGH);
  digitalWrite(8, HIGH);
}

void loop()
{
  // call the returned value from GetFromSerial() function
  switch(GetFromSerial())
  {
  case '1':
    digitalWrite(6, LOW);
    break;
  case '2':
    digitalWrite(6, HIGH);
    break;
  case '3':
    digitalWrite(7, LOW);
    break;
  case '4':
    digitalWrite(7, HIGH);
    break;
  case '5':
    digitalWrite(8, LOW);
    break;
  case '6':
    digitalWrite(8, HIGH);
    break;
  }
}

// read the serial port
int GetFromSerial()
{
  while (Serial.available()<=0) {
  }
  return Serial.read();
}
[/codesyntax]
C# App
Now we will create an app like the following
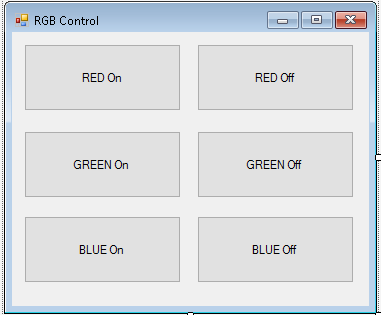
arduino rgb control
As you can see this is simply 6 buttons added to a form, in the code below you will see I named the buttons rather than leaving them as the default . You also need to add a SerialPort control to your form and add
using System.IO.Ports;
The code is simple if a button is clicked we send a number and the arduino will act on that switching on and off the LEDs
[codesyntax lang=”cpp”]
using System;
using System.Collections.Generic;
using System.ComponentModel;
using System.Data;
using System.Drawing;
using System.Linq;
using System.Text;
using System.Threading.Tasks;
using System.Windows.Forms;
using System.IO.Ports;

namespace RGBControl
{
    public partial class Form1 : Form
    {
        public Form1()
        {
            InitializeComponent();
            serialPort1.PortName = "COM6";
            serialPort1.BaudRate = 9600;
            serialPort1.Open();
        }

        private void btnRedon_Click(object sender, EventArgs e)
        {
            if (serialPort1.IsOpen)
            {
                serialPort1.WriteLine("1");
            }
        }

        private void btnRedoff_Click(object sender, EventArgs e)
        {
            if (serialPort1.IsOpen)
            {
                serialPort1.WriteLine("2");
            }
        }

        private void btnGreenon_Click(object sender, EventArgs e)
        {
            if (serialPort1.IsOpen)
            {
                serialPort1.WriteLine("3");
            }
        }

        private void btnGreenoff_Click(object sender, EventArgs e)
        {
            if (serialPort1.IsOpen)
            {
                serialPort1.WriteLine("4");
            }
        }

        private void btnBlueon_Click(object sender, EventArgs e)
        {
            if (serialPort1.IsOpen)
            {
                serialPort1.WriteLine("5");
            }
        }

        private void btnBlueoff_Click(object sender, EventArgs e)
        {
            if (serialPort1.IsOpen)
            {
                serialPort1.WriteLine("6");
            }
        }
    }
}
[/codesyntax]
Links
The complete project and Arduino code are available from the link below, the C# app was written in Visual Studio 2015. You can get this from Microsoft or use an older version if you have one
https://github.com/arduinolearning/Interfacing/tree/master/Arduino%20RGB
