5.7K
In this article we look at a temperature and pressure sensor, the STS35 temperature sensor from Sensirion, and connect it to an Arduino R4, you can use an older Arduino Uno. It will work just fine.
Sensor Information
The STS3x-DIS is Sensirion’s new high accuracy digital temperature sensor. It relies on the industry proven CMOSens® technology, providing for increased intelligence, reliability and improved accuracy specifications compared to its predecessors. Its functionality includes enhanced signal processing, two distinctive and user selectable I2C addresses and communication speeds of up to 1 MHz.
FEATURES
- Factory calibrated, accurate digital output
- High accuracy, ±0.1℃ temperature error
- Fast startup time, 0.5ms
- High reliability, long-term stability
SPECIFICATION
- Operating Voltage: 2.15~5.5V DC
- Heating Power Consumption: 3.6~33mW
- Output Signal: I2C
- Measuring Range: -40~125℃
- Accuracy: ±0.1℃
- Resolution: 0.01℃
- Preheat: ≤1.5ms (Typical, 0.5ms)
- Response Time: >2s
- Operating Temperature: -40~125℃
| Num | Label | Description |
|---|---|---|
| 1 | RST | Reset pin (pull down to reset) |
| 2 | ADDR | I2C address pin (default to be 0x4B, pull-down address is 0x4A) |
| 3 | SDA | I2C data line |
| 4 | SCL | I2C clock line |
| 5 | GND | Gnd |
| 6 | VCC | 3.3 to 5v |
Parts Required
You can connect to the sensor using DuPont-style jumper wire.
The sensor costs about $7.50 – I got it slightly cheaper as it was on offer at teh time.
| Name | Link |
| Arduino R4 | Aliexpress link |
| STS35 | DFRobot link |
| Connecting cables | Male to Male + Male to Female and Female to Female Jumper Wire Dupont Cable |
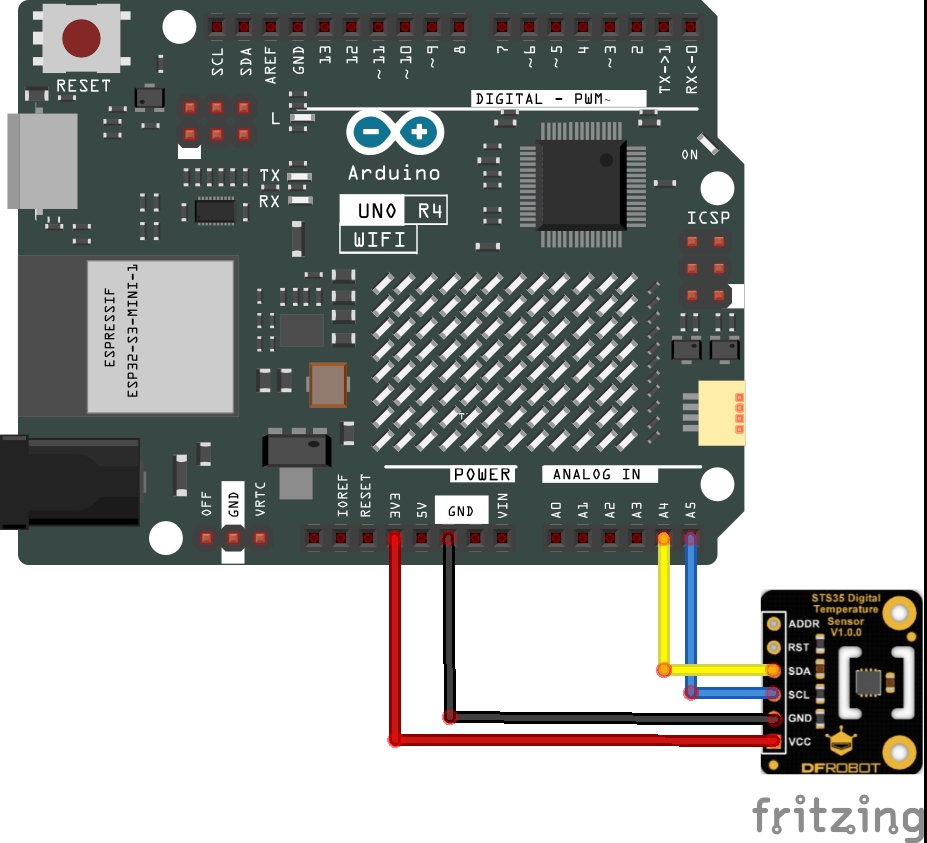
Schematic/Connection
Code Example
Download the library from github – https://github.com/DFRobot/DFRobot_STS3X/tree/main
Import the zip file into the Arduino IDE, this is one of the default examples
#include "DFRobot_STS3X.h"

/**
 * Determine I2C address according to the ADDR pin pull-up or pull-down
 * ADDR pin pull-down: STS3X_I2C_ADDRESS_A   0x4A
 * ADDR pin or pull-up: STS3X_I2C_ADDRESS_B   0x4B
 */
DFRobot_STS3X sts(&Wire, STS3X_I2C_ADDRESS_B);


void setup(void)
{
    Serial.begin(9600);
    /* Wait for the chip to be initialized completely, and then exit */
    while(sts.begin() != true){
        Serial.println("Failed to init chip, please check if the chip connection is fine. ");
        delay(1000);
    }
    Serial.println("Begin ok!");

    /**
     * Set measurement frequency
     * freq: Select e2S, e1Hz, e2Hz, e4Hz and e10Hz mode in the enumeration variable eFreq_t
     */
    sts.setFreq(sts.e10Hz);

}

void loop() {
    Serial.print(sts.getTemperaturePeriodC());
    Serial.println(" ℃");
    delay(1000);
}
Output
When run you will see something like this in the serial monitor window, this was doing the typical ‘touch the sensor’ test so you can see the temperature rising
Begin ok!
21.19
21.20
21.26
28.69
30.30
31.00
31.41
31.74
