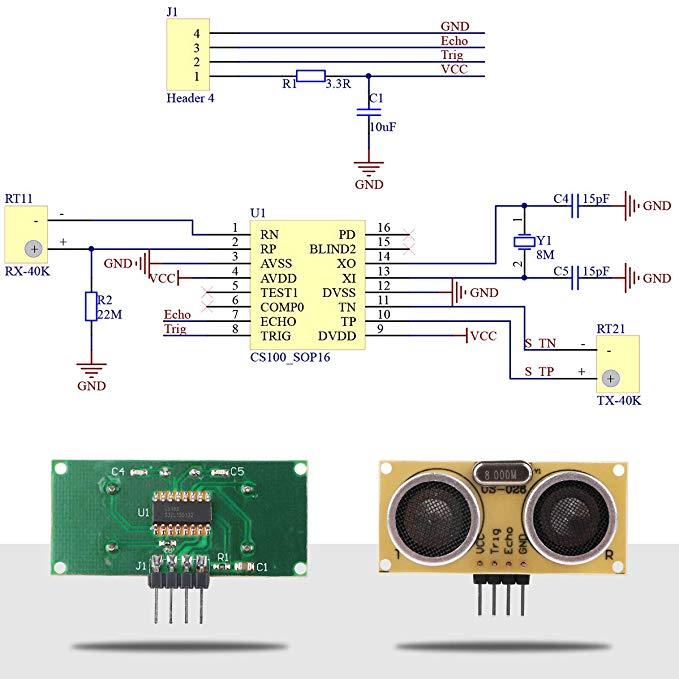
US-026 is an upgraded version of the HC-SR04, with a kind of high performance, low cost ultrasonic module. The module uses the CS100 , a high performance-cost ratio ultrasonic ranging chip.
US-026
It has high measurement accuracy and the measuring distance is farther than 6 meters. Good consistency, well stability.
It can realize 2-6m non-contact ranging. The working voltage is 3V-5.5V, working current is 5.3 mA and supporting GPIO communication mode.
US-026 has 4 Pin power supply and communication interface. It is single-side printed board. 4 pin is welded on the back side (the chip side).
Input a 10uS above high level to Trig pin, the system will emit eight 40KHZ ultrasonic impulse. The system detects the echo signal and output through Echo pin. Calculating the distance according the lasting time of high electrical level which exported by the ECHO pin.
1.This module has stable performance and accurate measurement distance.
2.Module high-precision, blind (2cm) ultra-close, stable range is the success of this product to the market a strong basis.
3.Using IO trigger ranging,to at least 10us of high-level signal.
4.The module automatically sends eight 40khz square wave, automatically detect whether there is signal return.
5.There is a signal return, through the IO output of a high, high duration is the time from the launch to the return of ultrasound.
Specifications:
Color:yellow
Working voltage: DC 3V-5.5V
Working current:5.3mA
Level output: High 5V
Level output: Bottom 0V
Sensing angle: not more than 15 degrees
Detection range: 2cm-600cm
Parts
| Name | Link |
| Arduino UNO | Arduino UNO R3 |
| US-026 ultrasonic sensor | US-026 Ultrasonic Detector |
| Connecting area | Cable Dupont Jumper Wire Dupont 30CM |
Connection
The Ultrasonic sensor has four terminals – +5V, Trigger, Echo, and GND connected as follows
- Connect the +5V pin to +5v on your Arduino board.
- Connect Trigger to digital pin 6 on your Arduino board.
- Connect Echo to digital pin 7 on your Arduino board.
- Connect GND with GND on Arduino.
Code
[codesyntax lang=”cpp”]
const int pingPin = 6; // Trigger Pin of Ultrasonic Sensor
const int echoPin = 7; // Echo Pin of Ultrasonic Sensor
void setup()
{
Serial.begin(9600); // Starting Serial Terminal
}
void loop()
{
long duration, inches, cm;
pinMode(pingPin, OUTPUT);
digitalWrite(pingPin, LOW);
delayMicroseconds(2);
digitalWrite(pingPin, HIGH);
delayMicroseconds(10);
digitalWrite(pingPin, LOW);
pinMode(echoPin, INPUT);
duration = pulseIn(echoPin, HIGH);
inches = microsecondsToInches(duration);
cm = microsecondsToCentimeters(duration);
Serial.print(inches);
Serial.print(” in, “);
Serial.print(cm);
Serial.print(” cm”);
Serial.println();
delay(100);
}
long microsecondsToInches(long microseconds)
{
return microseconds / 74 / 2;
}
long microsecondsToCentimeters(long microseconds)
{
return microseconds / 29 / 2;
}
[/codesyntax]
Output
Open the serial monitor and move an object to the sensor
2in, 6cm
6in, 16cm
40in, 103cm
40in, 103cm
2in, 5cm
2in, 6cm
12in, 30cm
11in, 30cm
11in, 30cm
