I use the core below – here are the instructions for the legacy Arduino IDE
I’ll cover the new Arduino 2 IDE, which was very easy to setup
Raspberry Pi Pico Arduino core, for all RP2040 boards
Documentation
See https://arduino-pico.readthedocs.io/en/latest/ along with the examples for more detailed usage information.
Supported Boards
- Raspberry Pi Pico
- Raspberry Pi Pico W
- Adafruit Feather RP2040
- Adafruit Feather RP2040 SCORPIO
- Adafruit ItsyBitsy RP2040
- Adafruit KB2040
- Adafruit Macropad RP2040
- Adafruit QTPy RP2040
- Adafruit STEMMA Friend RP2040
- Adafruit Trinkey RP2040 QT
- Arduino Nano RP2040 Connect
- BridgeTek IDM2040-7A
- Cytron Maker Pi RP2040
- Cytron Maker Nano RP2040
- DatanoiseTV PicoADK+
- DeRuiLab FlyBoard2040 Core
- DFRobot Beetle RP2040
- ElectronicCats Hunter Cat NFC
- ExtremeElectronics RC2040
- Invector Labs Challenger RP2040 WiFi
- Invector Labs Challenger RP2040 WiFi/BLE
- Invector Labs Challenger NB RP2040 WiFi
- Invector Labs Challenger RP2040 LTE
- Invector Labs Challenger RP2040 LoRa
- Invector Labs Challenger RP2040 SubGHz
- Invector Labs Challenger RP2040 SD/RTC
- Invector Labs RPICO32
- Melopero Cookie RP2040
- Melopero Shake RP2040
- nullbits Bit-C PRO
- Pimoroni PGA2040
- Seeed XIAO RP2040
- Solder Party RP2040 Stamp
- SparkFun ProMicro RP2040
- SparkFun Thing Plus RP2040
- uPesy RP2040 DevKit
- Viyalab Mizu RP2040
- Waveshare RP2040 Zero
- Waveshare RP2040 One
- Waveshare RP2040 Plus
- Waveshare RP2040 LCD 0.96
- Waveshare RP2040 LCD 1.28
- WIZnet W5100S-EVB-Pico
- WIZnet W5500-EVB-Pico
- WIZnet WizFi360-EVB-Pico
- Generic (configurable flash, I/O pins)
Installing via Arduino Boards Manager
Windows Users: Please do not use the Windows Store version of the actual Arduino application because it has issues detecting attached Pico boards. Use the “Windows ZIP” or plain “Windows” executable (EXE) download direct from https://arduino.cc. and allow it to install any device drivers it suggests. Otherwise the Pico board may not be detected. Also, if trying out the 2.0 beta Arduino please install the release 1.8 version beforehand to ensure needed device drivers are present. (See #20 for more details.)
Open up the Arduino IDE and go to File->Preferences.
In the dialog that pops up, enter the following URL in the “Additional Boards Manager URLs” field:
https://github.com/earlephilhower/arduino-pico/releases/download/global/package_rp2040_index.json
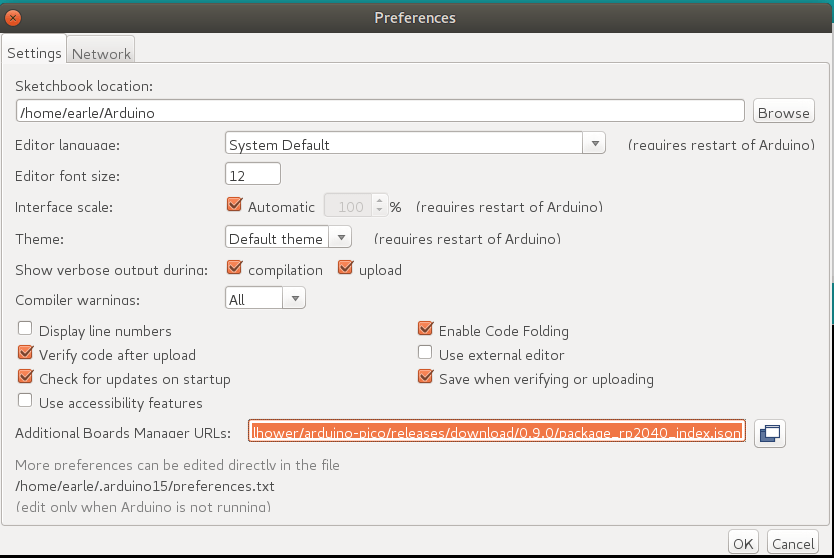
Hit OK to close the dialog.
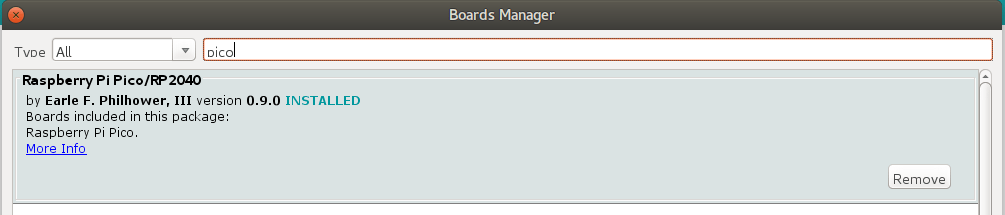
Go to Tools->Boards->Board Manager in the IDE
Type “pico” in the search box and select “Add”:
Uploading Sketches
To upload your first sketch, you will need to hold the BOOTSEL button down while plugging in the Pico to your computer. Then hit the upload button and the sketch should be transferred and start to run.
After the first upload, this should not be necessary as the arduino-pico core has auto-reset support. Select the appropriate serial port shown in the Arduino Tools->Port->Serial Port menu once (this setting will stick and does not need to be touched for multiple uploads). This selection allows the auto-reset tool to identify the proper device to reset. Them hit the upload button and your sketch should upload and run.
In some cases the Pico will encounter a hard hang and its USB port will not respond to the auto-reset request. Should this happen, just follow the initial procedure of holding the BOOTSEL button down while plugging in the Pico to enter the ROM bootloader.
Uploading Filesystem Images
The onboard flash filesystem for the Pico, LittleFS, lets you upload a filesystem image from the sketch directory for your sketch to use. Download the needed plugin from
To install, follow the directions in
For detailed usage information, please check the ESP8266 repo documentation (ignore SPIFFS related notes) available at
